Ensure that the steps mentioned in the installation guide are abided by throughout the installation process.
Do not modify the device unless recommended by the tech-nician sent by the manufacturer.
Do not operate with wet or moist hands as it may cause electrocution.
The device should be placed in a dry area, away from moisture & water.
Wear shoes/slippers at all times during hardware installa-tion.
Turn off the power supply before opening the switchboard and while rewiring the appliances.
Identify the phase and neutral wire connections inside the switchboard before connecting it to the device.
While making connections, do not interchange the phase and neutral connections to the 1+1 Node switch under any circumstances.
2. About 1+1 Node Switch
2.1 Description
1+1 Node Switch is a smart device that enables you to automate any one appliance and one fan. With this device, you can turn on/off an appliance and control the fan at one tap on your smartphone. The device will help you create your workflows or schedules so that you won't have to move a single muscle to make appliances work.
2.2 Features
Retrofit design: The 1+1 Node Switch can fit inside any switchboard.
Robust design: Advanced firmware and rugged hardware design for long-lasting performance
Built-in S-Wi-Fi: Equipped with secure Wi-Fi that ensures appliance control from any location
Voice Command: The automation app is compatible with all types of voice assistants such as Siri, Bixby, Alexa, Google Assistant and more.
Running hours: Get the detailed running hours and control history of the device on your phone.
Create workflow: Create timers and schedules to come up with the right workflow.
2.3 Specification
Power input: 240V AC, 50/60Hz.
Dimmer Levels: 0 to 4
Incandescent lamp/Resistive Load Per Channel: 800W
LED Load:120 W or 6 Nos (whichever is higher)
Inductive Load:200W
Typical standby power: <0.8W.
Operating distance from Wi-Fi router: upto 30 meters*. (depending upon router and its placement).
No of Channels: 2 (1+1)
No. of Relay Channels: 1
Capacitive Dimming Channels: 1
Dimensions: 77x40x25 mm
Communication Wi-Fi: Connects to 2.4 GHz, Wi-Fi 802.11 b/g/n
DISCLAIMER: Do not connect two fans to same dimming channel*
3. Device Set-up
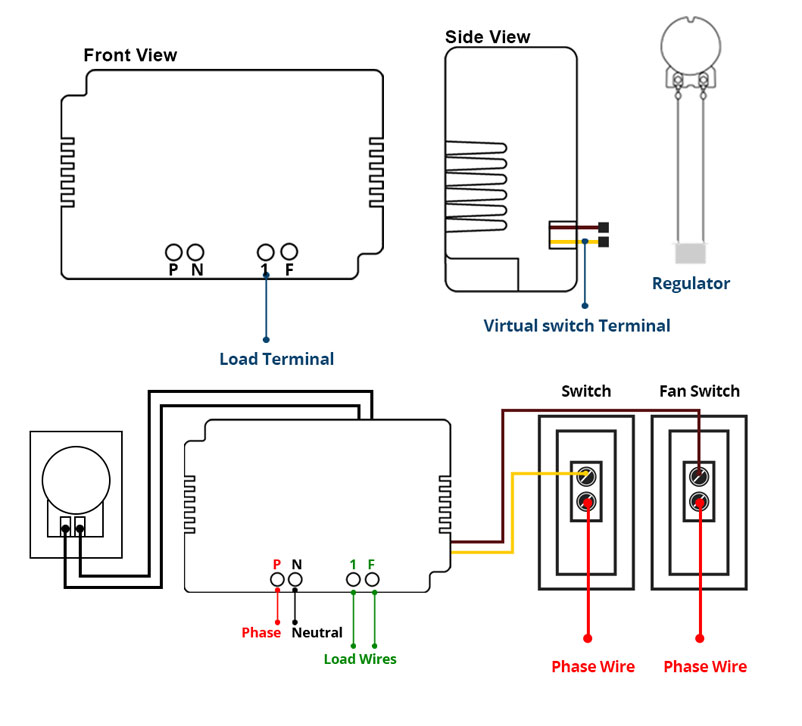
The below figures illustrates the wiring system of 1+1 Node Switch:
Follow the steps below to connect your wires to the 1+1 Node Switch
On the device, you can see the positions marked as 'N', 'P' and the numbered slot '1' and '2'. 'N' refers to the Neutral point, 'P' refers to the Phase point, '1' and '2' is the load terminal where you will connect the load wires of the appliances.
The virtual wire '1' and '2' are the wires that will replace the load wires at the corresponding load pin inside the switch-board. Fan connector is connected to the fan regulator that comes
with the 1+1 switch module. Draw a phase wire and connect it to the slot marked as 'I' on the device. Also, ensure that only one phase wire is connected to the device. Do not under any circumstance connect multiple
phase wires from appliances and inverters to the device. Draw a neutral wire from the switchboard and connect it to the
device where 'N' is marked. Now connect the load wires of the appliance and the fan you
want to automate at the numerical slot '1' and '2' ('2' for fan). Remove the existing regulator from the switchboard and
replace it with the regulator that comes with 1+1 Switch. Disconnect all the wires from the original regulator and unplug
the fan regulator knob. Unscrew the washer to isolate the switch plate. We will use the switch plate for the new regulator which came with the switch module. Connect and plug back the knob on the new regulator and place it back into the switchboard.
Take the virtual wires '1' and '2' of the device and connect it to the load pin of the respective appliance switch along with the fan connector to the regulator.
Once you are done connecting all the wires, insert the 1+1 Node Switch inside the switchboard and reattach it's wall plate firmly back onto the wall.
Please note that electric fluctuations inside the switchboard may at times hinder optimal device performance.
4. Configure the 1+1 Node Switch with the mobile app
It is mandatory to use a Wi-Fi router to configure the device.
If you are using mobile data, turn it off and switch to Wi-Fi.
Ensure that you are following the steps for configuration, in the same sequence, mentioned in the operating manual.
Step 1
Download the App.
The app is available in Google Play and Apple's App Store.
Create an account and log in.
Step 2
Once logged in, set up your 'Home' by clicking on the 'New Home' button.
If you have already created a 'Home', skip to 'Step 3'.
To create a home, pick a name and location and click on 'Create Home'.
There are two ways to provide 'Home' access to your family members and relatives.
1. Go to settings>Homes>My Home>Users. When you tap on users, you get an option to add a user. Enter the email ID or phone number of the family member to Provide them with the access.
2. Ask your family members to 'Join Home' when they are creating an account. It allows them to send you a request to add them as a user by entering your email ID or phone number. As a request arrives at your phone or email, you can provide them with access once approved.
Step 3
To set-up the switch device, Go to 'Settings> Devices'
Tap on the button
Out of the products list, select '1+1 Node Switch' and tap on 'Next'.
Scan the QR code present on the warranty card to register and tap on 'Next'.
Step 4
Ensure that the mobile data is disconnected.
When connected with your Wi-Fi, go to Wi-Fi settings and find the device Wi-Fi - 'switch_1+1_*******', in the list of Wi-Fi networks.
Click on the device network.
Return to the app and click on the checkbox 'Connected to switch_1+1_********' and tap on Next.
Step 5
Once the device Wi-Fi is connected, you will get a list of available Wi-Fi networks you can connect with to complete the configuration.
Select your Wi-Fi and enter the password to finish the con-figuration process.
As soon as the device connects, you will see a notification 'Configuration Successful - Tap on Next to proceed'
Once you tap on 'Next', you get an option 'Assign to a room' where you add the device to a particular room (where the device is located).
Also, you get an option to 'Name your Device', then click on 'Create Device'.
After you create the device, you get a notification 'Successful - Your device is added to the home, Go to Switches tab to start using switches'.
5. Controlling the appliance
To test the appliance and the switch, go to 'Devices' in the app and click on your `*** Room', tap on 'Switch onev' or the device name you created to test the device.
Once you tap on the option, the device will start working, and the Icon of the button will turn yellow.
At the bottom of the switch section, you can see the `Running Time' of the appliance, which allows you to check and manage your power accordingly.
You can tap on the device icon multiple times to see if the device is working smoothly or not.
6. Deleting Device
To remove the device from your list of devices, Go to Settings> Devices, select the device you want to remove and at the bottom of the device information, you get an option to 'Delete Device'.
7. Factory reset
To reset the device, toggle the switch on and off seven times within 7 seconds. This will remove the device Wi-Fi from your app.
The Wi-Fi network of the device will be again visible in the list of available Wi-Fi networks.
To reconfigure, you can follow the configuration steps from 'Step 3' mentioned above.
8. Disclaimer
In case the device is not working within the warranty period, and the user modified the product without prior notice, the device is not applicable under warranty services. Devices labelled with this symbol should not be disposed of with other household wastes. It shall be handed over to the applicable collection point for the recycling of waste electrical and electronic equipment.
The Product comes with best in industry one year manufacture warranty
Thanks for Purchasing
Our commitment is to provide quality products and best customer service to you. Your satis-faction is our top priority. For any suggestions or queries, please feel free to contact Us or write us at: info@inovic.co.in